

Yes, friends, today we will discuss how to get Sense approval on Blogger and WordPress. Friends, we all want to make money from our website. You all know that the world’s largest ad network is Google AdSense. Here’s how you earn money. The first is from the impression of your visitors. The second is from the clicks CPC (cost per click) coming from them. So in order to make money from Google Adsense, we have to follow some of their rules. And I’m saying that getting Google AdSense approval is not that difficult. If you follow the rules of AdSense, And I believe that if you read this article carefully today, You will not have much difficulty in getting AdSense approval. Here are some tips to help you get 100% AdSense approval. So let’s start the article (Google Adsense approval tricks). 1. Write quality content The first and foremost task to get approval from Google AdSense is to provide quality content to your website. Google always wants its users to have a good user experience. So, the first thing you need to do is look at your content. You must have heard that content is king. The first thing you need to do is to pay close attention to your content. So now the question that comes to your mind is what exactly is quality content? And how do I use this quality content on my blog? First you need to beautify your content so that your users do not have any difficulty in reading your content. Your content should be clear and easy to read. Users should not have any difficulty understanding it. You need to correct the readability and format of your content. Make sure the content is grammatically correct. At the same time, it is important to check that the spelling is correct. If the spelling is incorrect, it will be very difficult for your users to read your content. There are other things that you need to keep in mind, like you have given one of the headings of your article and your article has written about some other topic or suppose the links in your article are not useful or related to that topic. Misleading link in which you are putting your users in a misleading situation and misleading them. And also try to make sure that your posts are at least 700 words. In my case, I write more than 1,000 words in almost every post. And the subheadings of your article should not exceed 300 words. 2. Your blog has at least 20+ articles Whether you use Blogger or WordPress, you should always make sure that there is no problem with your content. Google first checks the content of your blog. I’ve told you this before. I’ll suggest having at least 20 or more articles in your blog. Try to have 1000 words in each of the 20 posts. For the time being, make sure there are at least 700 words in an article. In my case, my blog had a total of 20+ articles, and each article had 1000 words or more. I’m not saying that AdSense is not approved without 20+ articles and there are some blogs that have less than 10 articles What is off-page SEO, and how do you do it? But still having Google AdSense approved can tell their fate or experience, but you should not think of them. So if you pay good attention to your work, your success will inevitably come. It will take some time to approve AdSense on the blog. I think it will take about 3 months. I think at this time you can write 50 articles if you work hard. 3. Create pages for adsense approval Friends, the topic we are going to discuss now is whole pages. Pages usually contain all the information about the rules of your website. It could also provide the purpose of the website. Alternatively, it could explain what the site was created for or how it works. Adding a page to your site will help your users understand your site better or your visitors’ relationship with you will be better, and it will help users to understand Google and your site. You may be wondering about the relationship between users and the page. You might also wonder about the relationship of Google AdSense. Suppose you contact us on your blog. Adding a page will allow your visitors to contact you easily. Suppose you put a sitemap on your blog or website. It will help Google AdSense understand the structure of your website. It will also help your visitors understand how your blog is structured. Pages are very important for AdSense approval, and you will notice that every professional site. Every site you look at will have some general pages. If you look at my site properly, you will see that my site also has pages. Here are the pages you should have on your blog: Also, if you want to add more pages, you can add a product/service page. You might also consider adding an archive page or a custom 404 page. If you do not have these pages in your blog, then create these pages. If you do not know how to create these pages, Then, the name of the page you will create in Google should be determined. The generator’s name on the back of your website will appear. It will generate many free and paid options for your website. It will create the page. For example, if you want to create an About Us Page, search for About Us Page Generator. If you want to create a Privacy Policy, search for Privacy Policy Generator. Yes, this way you can easily create pages. 4. Write Google AdSense-supported languages Friends AdSense Approval AdSense but now only approves 50 languages, so if you choose one of these languages and start giving your blog content, AdSense will approve your blog. So if you publish your content in a

Step-by-Step Guide to Create a Google AdSense Account in 2026
How to Create an Account on Google Adsense? Friends submit thousands of AdSense approval applications to Google every day, but some of these websites give AdSense approval. Friends are earning a lot of money from their website. They are making money every day with some good content on their website. If you are also willing to make money, start working today and monetize your content today. If you follow some basic rules, AdSense will approve your content. You need to follow some AdSense rules and send it for approval. I have already discussed the tips and tricks of Adsense approval. You must have read it. My dear friends, you have to follow the rules of AdSense for the approval of your website. Also, you must apply for AdSense. There are some important rules and regulations that you have to follow properly. But there is no reason to worry. If you read this article from beginning to end, I promise you. You are going to read one of the greatest articles for AdSense today. In this article, I will give you some pro tricks from my experience so far. I am also going to share with you some results of my research. So let’s get started. Some rules before creating an AdSense account Before creating an AdSense account, you need to keep some rules in mind. I think you are going to connect with the AdSense ad network; you have to follow some rules of AdSense. You can think of it as an extra tip from me. I have already given a description of these tricks, i.e., Google AdSense tricks, in a post. You can read the article if you want. I believe that if you follow these tricks correctly and create an AdSense account, you will get 100% approval. The right way to create an AdSense account See the steps to create AdSense Account with the mind so that there is no disadvantage Step 1: The first step in creating an account is to enter the official website of “Google AdSense”. You can search on Google to find it. Alternatively, follow this link provided by me, and you will go to the official website of Google AdSense. Step 2: When you enter the official site to create an AdSense account, you will see the Google AdSense dashboard. It looks like the image above. Click on a blue button that says Get Started. Step 3: If you click on the Get Started button, you will be redirected to the “Choose an Account Page.” There you will have to select an email. Step 4: Your site/that email must be an 18-year-old’s. If you create a new account, it must also be an 18-year-old’s email. Otherwise, the AdSense team will never approve it. Step 5: After selecting any one email, you will be redirected. You will then arrive at the “A Couple of Things Before You Start” page. Just like the picture below Step 6: You can see the option of your site in the image above. You have to give your domain name there. For example, blog.codexhui.com Step 7: You must have a valid site for this. Enter the domain name in that domain option. Remember, you must use the domain name, not the URL. Step 8: Get more out of AdSense. This option is optional. If you like it, you will get some suggestions from AdSense Official. In my opinion, if you like it, you will get suggestions from Google. Step 9: Then you will see the “Let’s Get You Started” page. There you will see 3 options; you have to fill up these three options. Step 10: Click on the Tell Us About You section. You will be redirected to a separate page. Step 11: There you are on the customer information page. Here you have to provide some details. Step 12: First select your account type. Then enter your name, address line 1 and 2, city, pin number, state, and mobile number. Then click on the submit button. Step 13: In the next option, select “See how ads look on your site.” You can then turn on the ads look for your site. Step 14: This setup was the final setup to apply for AdSense. You will also get one such code, which you need to paste in the <head> section of your website. Only then will the last step of creating your Google AdSense account be completed. How to Log in to the AdSense Account? Similarly, you have to go to the AdSense dashboard and click on the sign-in button. After that, log in again with the same email you used to create the AdSense account. After logging in, you will see that your AdSense account is pending. If everything is ok, then within 1 week your site will be ready to show ads.
Build PHP CRUD App MySQL & Bootstrap 5: Step-by-Step Guide 2026
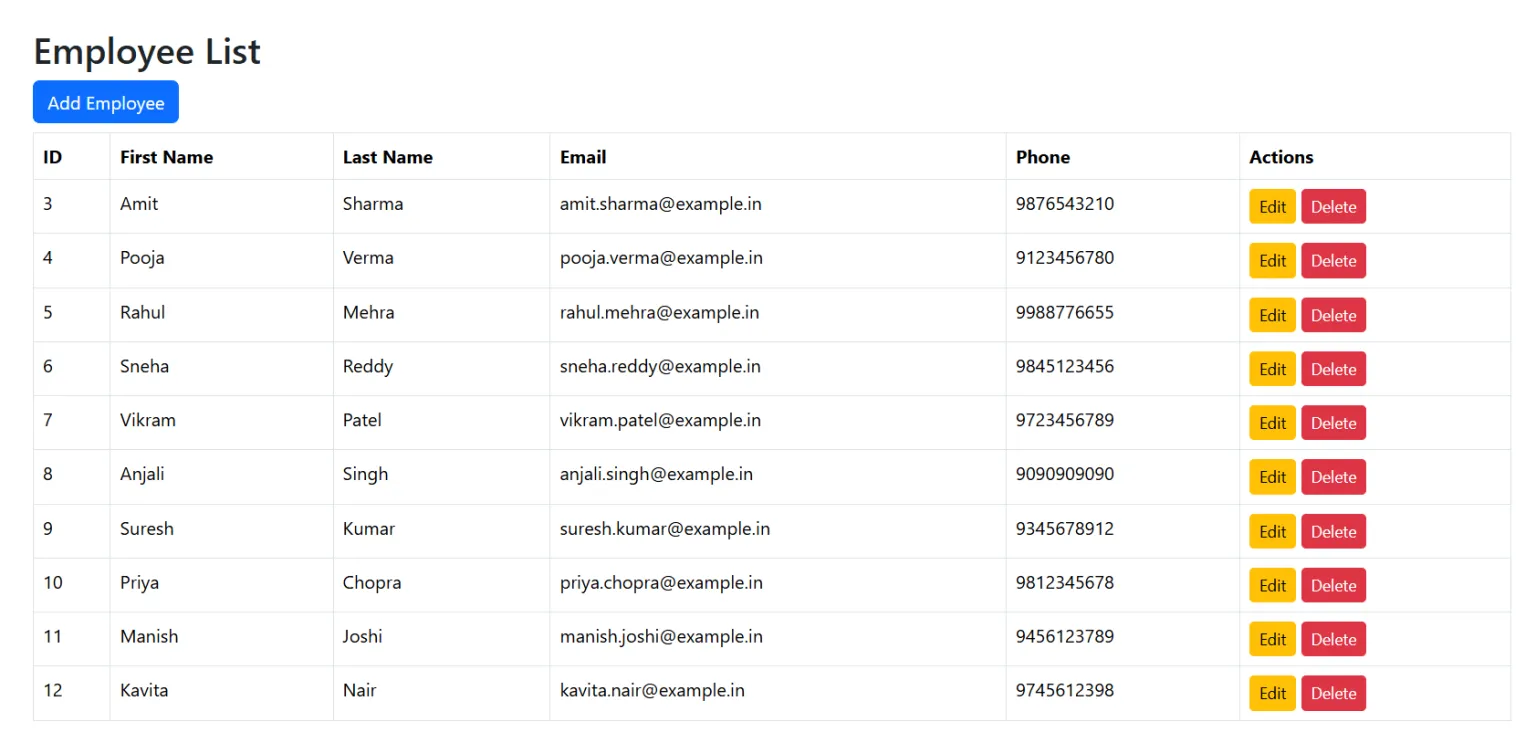
Build PHP CRUD App with MySQL and Bootstrap 5 (2025 Step-by-Step Guide) In this tutorial, we will build a CRUD (Create, Read, Update, Delete) application using PHP, MySQL, and Bootstrap 5. This guide is specially curated for curious students or beginners. It is perfect for those who want to get hands-on with PHP. You will build a basic yet functional web application. In this tutorial, we will build a CRUD (Create, Read, Update, Delete) application using PHP, MySQL, and Bootstrap 5. This guide is specially curated for curious students or beginners. It is perfect for those who want to get hands-on with PHP. You will build a basic yet functional web application. Project Features Feature Description Language PHP 8.3.19 Database MySQL Framework Bootstrap 5 Functionality Create, Read, Update, Delete Setting up the Database Method 1 – Manually via phpMyAdmin Add the following fields: i. First open your XAMPP server. Then Start Apache or MySQL Access phpMyAdmin Open the browser and go to: 👉 http://localhost/phpmyadmin ii. Create a MySQL database named CRUD and a table employees: iii. Here is your create table name employees iv. Then setup the column or, as you say, field names Method 2 – Using SQL Query Creating the Application Files Go to C:\xampp\htdocs\ and create a folder called CRUD-APPLICATION. Inside it, create the following files: Also, create a folder assets and add the bootstrap.min.css file for styling. If you ommit this Assets you can ommit this db.php Set up a database connection. This is the important setup for the database connection. It will help us connect with database tables. We create a file named db.php. In the below file, you see The variables store the database connection parameters. Like, $host, $user, $pass, and $db in these variables. We store the important server information. The line $conn = new mysqli($host, $user, $pass, $db); creates a new instance of the mysqli class. It connects to the MySQL server using the specified credentials. or this condition if ($conn->connect_error) { die(“Connection failed: ” . $conn->connect_error); } is checking the connection. If the connection is not successful, then show the error. If you want this DB code, use describes on your page, but we put this in the file DB.PHP that will be reusable, providing us a centralized connection. This approach is also easy to manage, and we handle the connection-related errors. index.php – Read All Records This PHP page is only for the main user interface. There is a show. The main table here is showing the table, I mean the employee list. Also from here, we fetch the user details. You see how We set up the CRUD application UI with PHP step-by-step. First, we connect the DB in the head. We set up the title Employee List. We connect the Bootstrap CDN CSS. In the body, we give the link to the add page. You can also delete or edit in the particular rows in the table. This page function is Read Here SQL Query Used: SELECT * FROM employees. Create.php – Create Record This is the page of add. Here We submit the user details like first name, last name, email, or phone. You see the query of Add user here. We used the SQL query INSERT INTO. edit.php – Update Record Delete.php – Delete Record Here in this code, we write delete code in PHP. Here, we delete the records. Here, we used the SQL query DELETE. Summary Or Conclusion So we finally completed our PHP Bootstrap CRUD application. This is an easy project using PHP. Here, we need some improvements. These include form validation, using Ajax datatables, or jQuery confirm success messages. In this blog, we mention or create this advanced code. If you are interested in learning more with Codex, you can also check those articles to create advanced applications. If you find any bugs or errors, please inform me for future improvements. You join or contact me in the comments or reach out through the contact page for specific inquiries. 🔗 Download the Project from GitHub This project is open source and available on my GitHub page. You can freely download, use, or contribute to improve it. I regularly update my repositories with beginner-friendly projects and code samples. 👉 Visit: GitHub – View & Download the PHP Bootstrap CRUD Project
How to Install CodeIgniter 4: Step-by-Step Guide (2026)
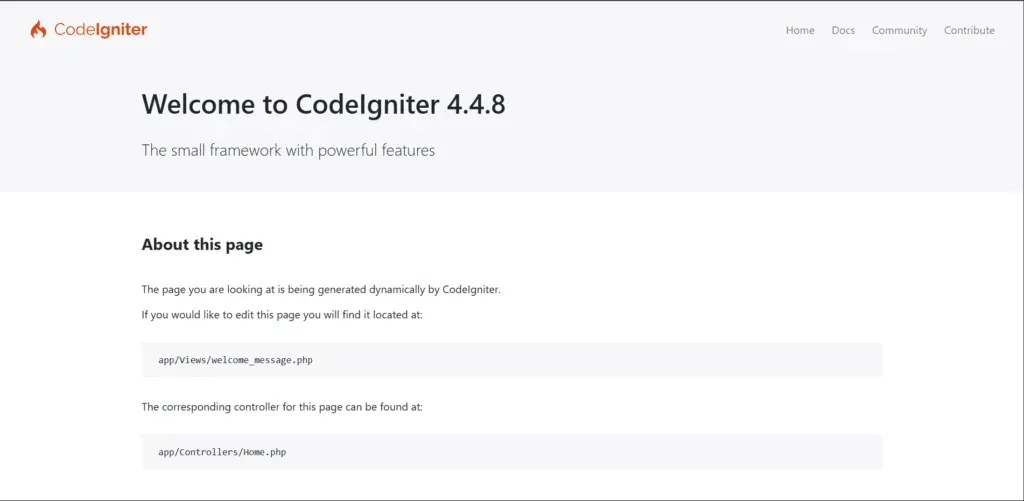
PHP is still one of the most widely used programming languages for web development in 2026. Many developers use PHP frameworks to build applications faster and keep their code organized. One of the most popular lightweight frameworks is CodeIgniter. CodeIgniter is known for its simple structure, fast performance, and easy learning curve. It follows the MVC (Model-View-Controller) architecture, which helps developers organize code properly. Because of this, CodeIgniter is widely used for building dynamic websites, admin panels, APIs, and business applications. If you are starting with PHP frameworks, CodeIgniter 4 is a good choice. In this tutorial, you will learn how to install CodeIgniter 4 step by step on your local computer. What is CodeIgniter 4? CodeIgniter 4 is the latest version of the CodeIgniter framework. It is built with modern PHP standards and includes many improvements compared to older versions. Because of these features, many developers use CodeIgniter for small and medium web applications. Requirements Before Installing CodeIgniter 4 Before installing CodeIgniter 4, make sure your system meets the basic requirements. If you are using XAMPP, make sure Apache and MySQL services are running before starting the installation. Methods to Install CodeIgniter 4 There are two common ways to install CodeIgniter 4 on your system. Both methods work, but Composer installation is recommended because it automatically installs required packages and dependencies. Method 1: Manual Installation of CodeIgniter 4 The first method is downloading the framework manually from the official website. Visit the official website: https://codeigniter.com Download the latest version of CodeIgniter 4. After downloading the ZIP file, extract it on your computer. If you are using XAMPP, move the extracted folder into the following directory: You can rename the project folder to anything you like. For example: Running the Development Server After placing the folder inside the htdocs directory, open Command Prompt and navigate to the project directory. Now run the following command to start the CodeIgniter development server. This command will start the local development server. You will see an address similar to this: Open this address in your browser. If the installation is successful, the CodeIgniter welcome page will appear. Method 2: Install CodeIgniter 4 Using Composer The second method uses Composer. This is the recommended way because it automatically installs all required dependencies. Step 1: Download Composer Go to the official Composer website: https://getcomposer.org Download the Windows installer file. Step 2: Install Composer Run the installer and follow the setup wizard. During installation, Composer may ask you to select the PHP executable file. If you are using XAMPP, choose the following path: Complete the installation process. Step 3: Verify Composer Installation Open Command Prompt and run the following command: If Composer is installed correctly, the version number will appear on the screen. Step 4: Create a CodeIgniter 4 Project Navigate to the htdocs folder. Now create a new CodeIgniter project using the following command. Composer will download the framework and create the project folder automatically. Step 5: Run the Project Move into the project directory. Start the development server. Open your browser and visit: You should now see the CodeIgniter welcome page. Conclusion In this tutorial, you learned how to install CodeIgniter 4 using two different methods. Manual installation is simple, but using Composer is the recommended approach because it manages dependencies automatically and keeps the framework updated. After installing CodeIgniter 4, you can start building web applications, APIs, and dynamic websites using the MVC structure. Learning CodeIgniter is a good step for developers who want to improve their PHP development skills.